
A sort of tutorial… Using Sketchup and Photoshop to create BG-CG’s for your OELVN projects… fast…
September 15, 2010Disclaimer: The Sketchup components you see here does not belong to me. I did not create them nor am I claiming them. We are only using them for educational purposes and to demonstrate the awesome convenience and potential of sketchup and 3D warehouse has to offer in production of BG-CG’s for OELVN’s (and I kinda feel lazy today)… insert more legal crap here…
OK so where were we?…
Cielo Says:
Every time I see you posting about your Sketchup work, I start praying for a tutorial D:
Deji Says:
I second what Cielo says *nods*
OK, I give a tutorial… err… OK maybe not quite a tutorial but close. Rather, I’ll show how I do things and hopefully I could share a few of my secret techniques so others can benefit. My method is obviously not the best out there nor was it morally correct (were practically cheating here). I put emphasis more on speed than quality… better have 10 BG-CG’s in two weeks and get the job done rather than wait for 1 beautiful handdrawn BG-CG and suffer from burnout. I use google sketchup to create scenes… fast… Google sketchup is very easy to learn, more easier than photoshop and with Google’s 3D warehouse, you now have a whole library of objects, buildings and anything in between accessible anytime (though if you’re gonna use this to create BG-CG’s for your project… I really do suggest you create your objects from scratch to avoid being frown upon by elitists and other artists). Let’s go to actual content now… Prequisite: Must know basic sketchup and familiar with navigation and intermediate photoshop skills.
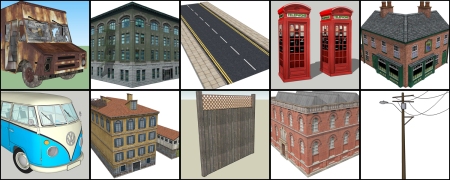
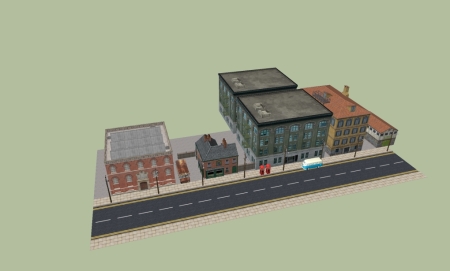
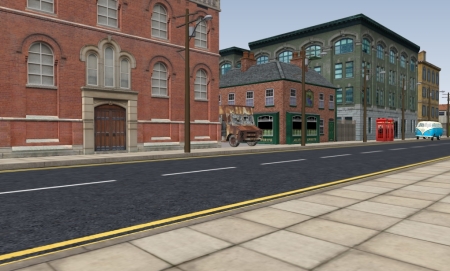
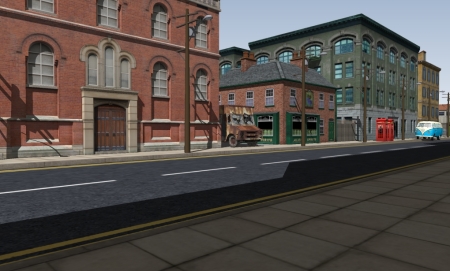
Using the components we downloaded from Google 3D warehouse. We will make a scene out of them… in this case a small section of some city block.
After putting everything in place, you’ll now position the camera to get a good view (like the one above).
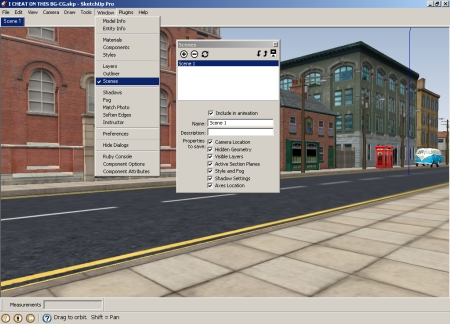
Now that you have chosen a good view, you must save this view (camera position) by going to WINDOW > SCENES and a new window will pop up. Press the + Icon to create and save your current view. A new tab will appear near the top left of the screen named Scene 1. This very important. You can always go back to your chosen view in case you needed to edit/remove/add a few components in your scene.
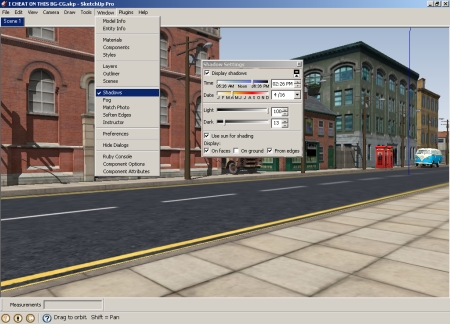
Next… we will add shadows. Go to WINDOW > SHADOWS and a new window will pop up. Check the Display shadows box to enable shadows and adjust the sliders till you get the desired effect.
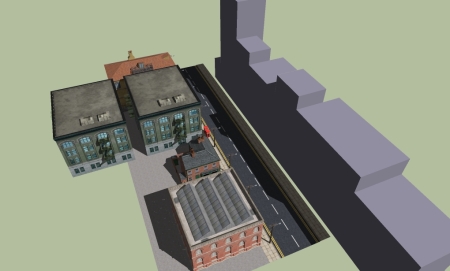
Once satisfied with the shadow, though optional, try adding a few large blocks across the streets. No need to texture them since we just needed them to cast shadows to give the impression that there were structures in front.
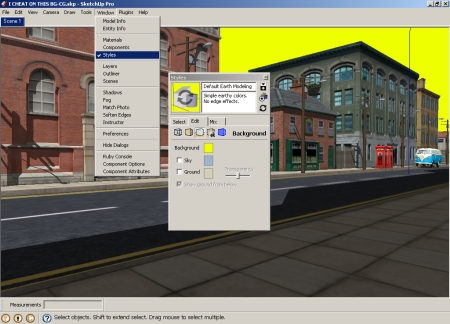
Now that you have shadows, components and scenes the way you wanted… it’s time to export them to Photoshop. Go to WINDOW > STYLES and a new window will pop up. Try imitating the settings you see here except for the color. For the color, try choosing a color that is contrast to the rest of the scene (in this case, I chose neon green)
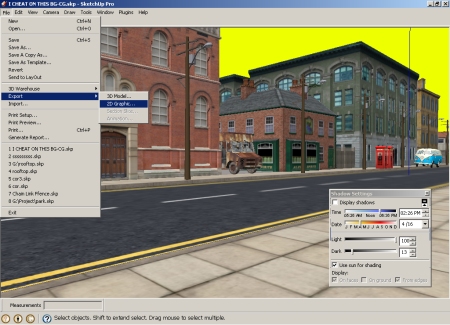
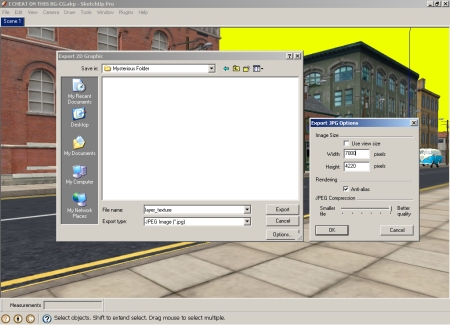
Go to WINDOW > SHADOWS and un-check the Display shadows field to hide the shadows. After that go to FILE > EXPORT > 2D GRAPHIC and export the current scene as JPG. It is highly recommended that you export the image in the largest possible your machine can handle. This very important since exported graphics is slightly jagged of course, it will become very delicious when finally reduced in size… more on that later.
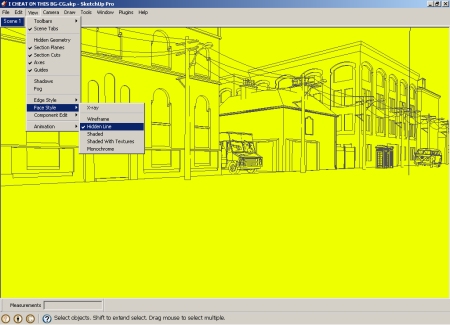
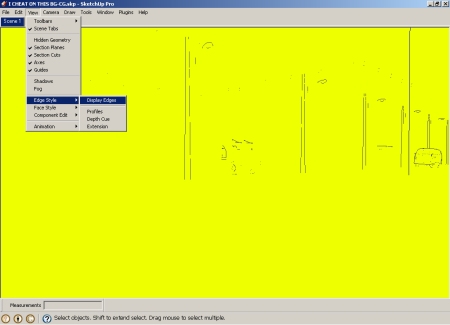
After exporting your first image, go to VIEW > FACE STYLE > HIDDEN LINE and you’ll notice that the textures is no longer visible. Next, go to VIEW > EDGE STYLE and uncheck DISPLAY EDGES… now only the BG and a few objects are visible.
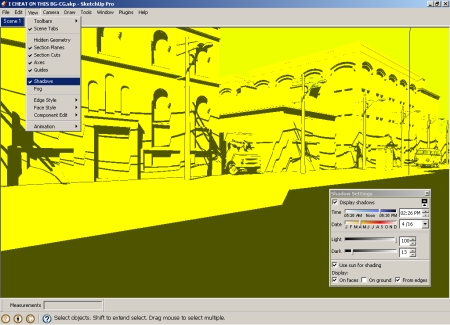
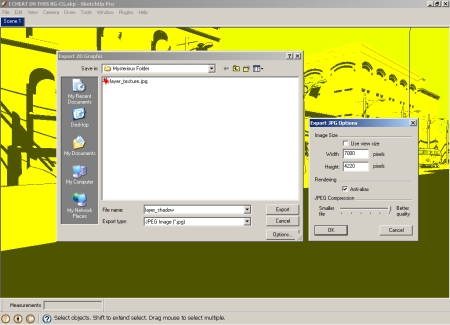
After doing the steps above, it’s time to once again show the shadows. Go to VIEW > SHADOWS and re-enable DISPLAY SHADOWS once again. After that go to FILE > EXPORT > 2D GRAPHIC and export the current scene as different JPG. It is highly recommended that you export the image in the largest possible your machine can handle.
Now we move to Photoshop…
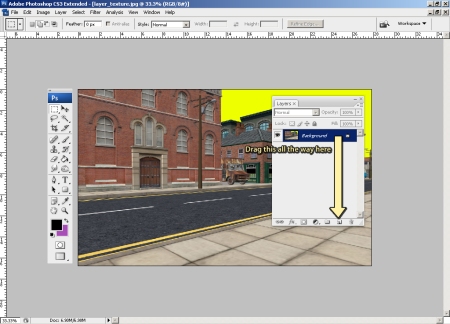
Open the first file you’ve exported in photoshop and follow the instructions shown above.
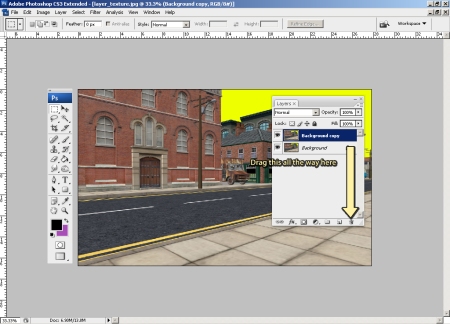
If done correctly, you’ll now have two identical layers. Once again follow the directions on screen and delete the original layer.
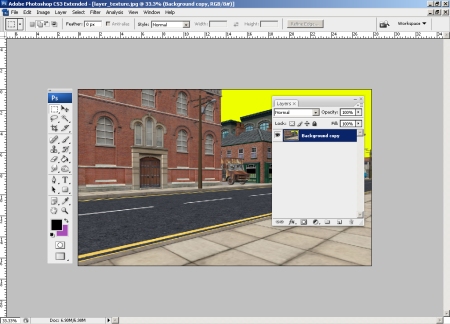
Now, you have an unlocked layer as shown above.
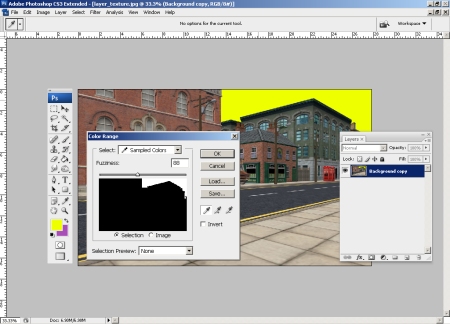
Here’s the tricky part, go to SELECT > COLOR RANGE and a new window will pop up and your icon will now change into a dropper of sorts. Click that dropper thing into the high contrast color to sample it (remember the neon thing) and you’ll notice that the silhouette on the new window now changes and displays the range of the sampled color (yep the neon thing)
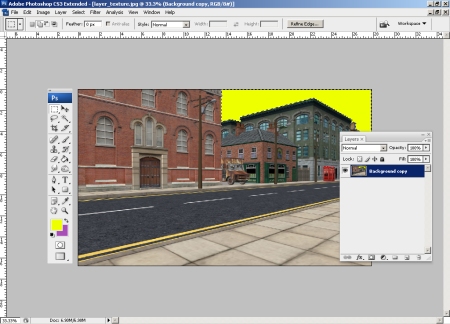
Once you’ve pressed OK you’ll notice that the sampled range of color is now selected.
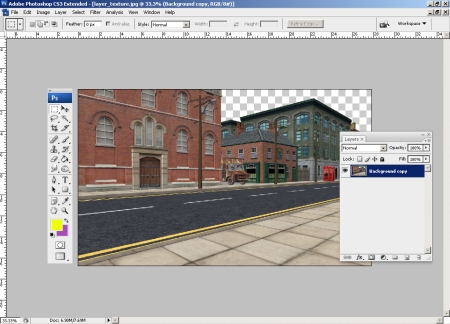
Hit delete on your keyboard to make it go bye-bye…
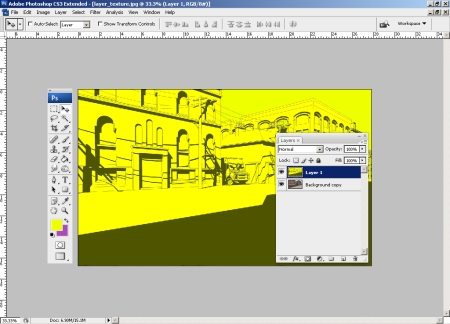
Now open the second image you’ve just exported from sketchup and place (import) it above your current layer as shown here.
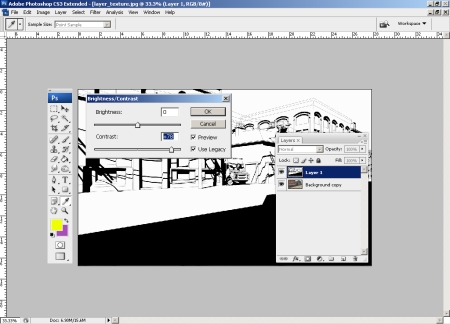
With the new layer active, press SHIFT + CTRL + U to desaturate the current layer (the one with shadows) and then go to IMAGE > ADJUSTMENT > BRIGHTNESS/CONTRAST and adjust the sliders till the dark parts are really dark and the light parts are really light…
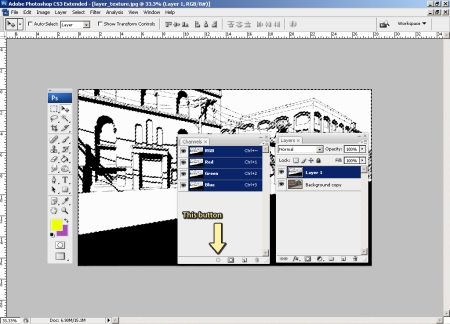
Go to WINDOWS > CHANNELS and a new window will pop up. Click the load channels as selection (see image) to have the light parts selected.
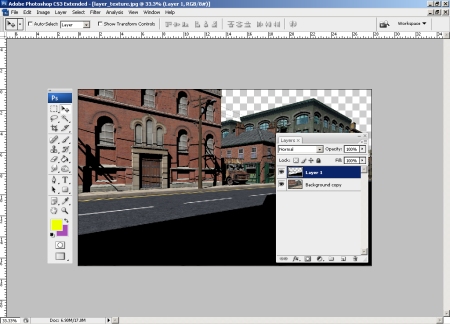
Hit the delete button and now the light parts are gone leaving us with only the shadows.
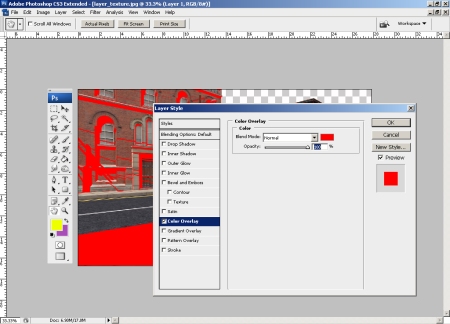
Now go to the layers panel and make sure the second layer is the active one (the shadow one)… Right click on it and choose Blending Options. A new window will pop up. Click and activate Color overlay.
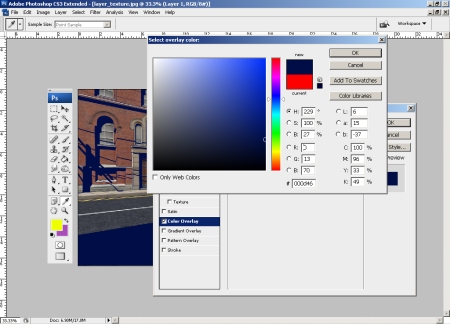
Click on the colored box (the red one) and change it’s color to something more blue dark but not total black.
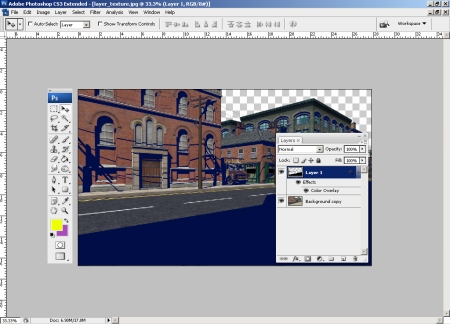
If done correctly, your shadow is now dark blue.
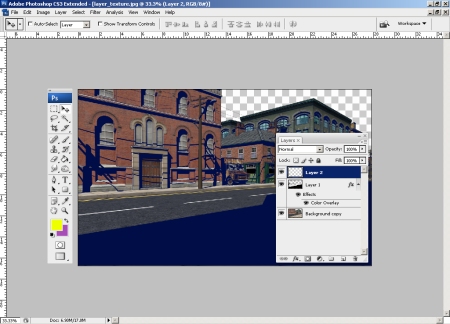
In the layers window, create a blank layer at the topmost layer (above the shadows layer)
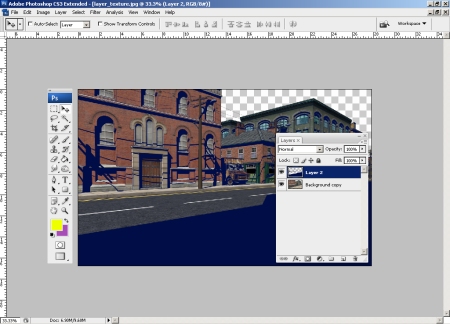
Merge the blank layer together with the layer below it (the shadow layer) to form a single layer.
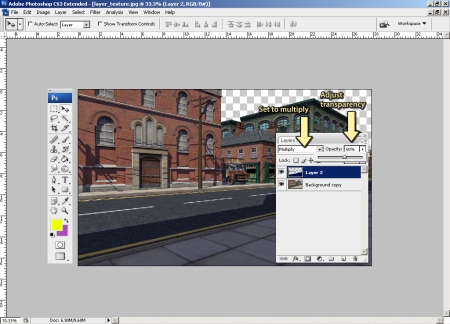
Once again on the layers window, make sure the topmost layer is the active layer and copy the settings shown above.
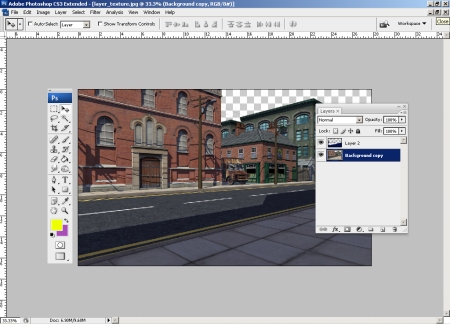
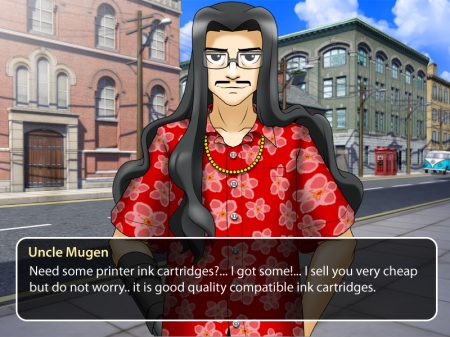
Now, you have a separate layer for textures and another layer for shadows with a transparent sky where you could google and put any type of sky you want. From here, you could now use photoshop to manually add a couple of details and retouches to get something that resembles the picture below.
OK, so it didn’t turn out as nice as expected… let’s see, maybe it has something to do with us using real life textures. In this case, you could inch closer towards that hand drawn look by having hand drawn textures (or butcher them in photoshop to make them resemble hand drawn textures)… Lol! I know… excuses… do not worry this is just first part of this tutorial…
I talk too much lately, I’ll go now…


Damn, that like magic.
Whoa. I really should take the time some day and learn to use Sketchup.
My prayers have been answered! >=> *runs off to practice your method with warehouse models* Now what’s left to learn is how to actually create good assets…xD
Thanks for sharing ♥
Thanks for this.
You may not know it but because of you, I started using Sketchup a few months ago for my backgrounds.
You are my BG hero. XD
Hi there. Nice use of some of my Sketchup models! If anyone wants to see more of them please search 3D Warehouse for IDW. You should also find a link to send any messages – e.g. resonable quick questions about how I made them, textures, etc. And yes they can be used freely for non-commercial work and no they cannot be sold on-line, in collections, etc. sorry.
Those objects in Google Warehouse, could we use them in commercial projects (safely)?
trully artist.